Part 3b - Polishing Your Audio (Touch-Ups)
NOTE: When doing this, make sure you are only editing your acapella in Single-Track Mode
Reverb
If you listen to ANY professional CD, you are going to hear a reverb. Alot of people think reverb is just a weaker version of echo, but reverb is a process that expands sound and echoing is the repitition of sound. I REALLY despise the use of Echoes on your audio, because Reverb gives it more of a professional touch. To get into Reverb, goto:
Transform > Delay Effects > Reverb
Alot of people use presets that over abuse the reverb effect. I recommend selecting the "Tight And Close" preset above the others. If you want your reverb to have more definition than the "Tight And Close" filter, then you can make it stand out with the "Vocal - Nice Presence" preset. Hit OK.
Ā
Echo/Coffin Filter
Some people record their audios in room that aren't suitable for "Echo-proof" recording. Before they even touch filters, their audios already have a echo in them caused from sound waves bouncing off the walls in the room they are recording in. If this is happening to you, you can get that out by going to:
Transform > Delay Effects > Echo Chamber
Chose the "Wooden Coffin" preset and hit OK. This should solve your troubles.
I have gotten complaints that this doesn't work for everyone. If you find this not to work, either, then you may want to turn your closet to a recording booth. Clear your closet out, and tack up a bed spread to surround you nearly 360║, of course, you don't want to wrap the spread over the door.
Now you are ready to move your set up into your closet. If your microphone's cord isn't long enough, refer to the Introduction to read about cables.
Each time you are going to record, clear out your closet, and when you are finished, put all your clothes and other possessions back in the closet.
Ā
Sho-Down's Studio Voice
This is a very nice tip right here brought from Sho-Down of RockIt Productions, one of the few eminent beat making and production sites online. It works with the Prametric Equalizer Filter on Cool Edit. Alot of people use this filter before they do anything, but it works more efficiently when it is the LAST step of Polishing Your Audio. To use the filter, goto:
Transform > Filters > Prametric Equalizer
Now alter your settings to EXACTLY copy the following example.
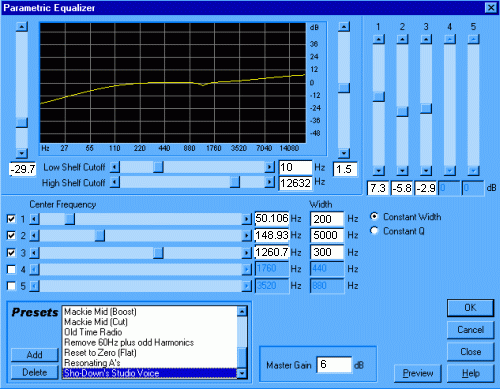
Make sure all your settings match that GIF Image exactly. This filter WILL lower the bass and increase your treble some, so if you don't like the after effects of this exact setting, then mess around with the settings and numbers until it is suitable for your desired sound.
Muchos props to Sho-Down of RockIt Productions for blessing us with this tip. Please show him some support at www.mp3.com/RockItProductions
Ģ VIEW PRINTABLE VERSIONĀ Ā