Part 2 - Cleaning Your Audio
NOTE: When doing this, make sure you are only editing your acapella in Single-Track Mode
1. Noise Reduction
This is always my first step. Noise Reduction will eliminate that nasty unwanted hiss and hum in the background of your recording. First, record yourself on your microphone only saying "test one" and let the recording continue 5 seconds without making ANY noise in the background. After you are finished, highlight 0.300/seconds of the part where you are making no noise. While that is highlighted, goto:
Transform > Noise Reduction > Noise Reduction
Choose "Get From Profile Selection" and set the Reduction level to 95%. After you are done with that, hit Save Profile and put this file in a folder where no one will delete it. Now hit OK.
*NOTE: The next time you use Noise Reduction on your vocals, just open the original file you saved before with the Load Profile button and hit OK*
2. Silence and Delete
Now that the hiss is eliminated you can see your pure vocals through looking at the wave forms. At this point of editing, it is good to Silence and Delete unwanted background noises. You should notice right after Noise Reduction that there is a lengthy amount of time from 0:00 secs to when your vocals start and between the time where your vocals finish and the audio ends. To delete this excess amount of time, highlight that area of unwanted sound ONLY and goto:
Edit > Delete Selection
Now listen to your audio thoroughly from beginning to end and point out any gaps, or lengthy periods of your verse where you aren't saying anything or making any noise. Highlight only those sizable gaps, and individually goto:
Transform > Silence
*NOTE: To maximize both of these effect to the fullest capability, I highly suggest you Zoom In before Silencing or Deleting a selection*
3. 4:1 Compression
It is very hard to record a complete verse without being too loud at some point than other points. To fix it where this can be nuetral, a Compressor solves this. This compressor takes your vocals and fixes them where they are leveled out at 20dB which is perfect to use the steps mentioned after this and keep your emotion leveled. To use this goto:
Transform > Amplitude > Dynamics Processing
Now select "4:1 Compressor > 20dB" and hit OK. You will notice immediately that your waveforms will visually lose some definition.
4. Antares Mic Modeler
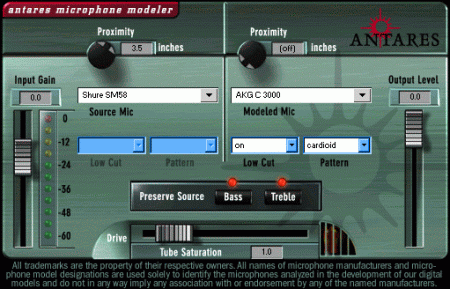
I would have to say this is probrably THE most talked about DirectX plug-in online. Its job is to work with your vocals so your microphone will appear to mimic other microphones. It is not 100% effective on mimicing other mics, but with this Vocal Editing Process, you can't deny how much it really compliments your finished product. If you have Antares Mic Modulator goto:
Transform > DirectX > Antares Mic Modeler
Even if you aren't using one, set your Source Mic to the Shure SM58. Now set the Proximity Inches of the Source Mic to 3.5 inches.
Set the Modeled Mic to the microphone of your choice. I prefer the AKG C 3000 with the Cardiod setting for its pattern. Put the Low Cut ON and Preserve both the Bass and Treble sources. Your choice of Tube Saturation, if needed. Now you are ready to hit OK.

If this is your first time doing this step, before you hit OK, select Add Preset. The next time you want to use this plug-in, all you have to do is load it from the Presets list.
5. Normalization
I do not suggest using the Amplify option in Cool Edit simply because I have noticed it takes away from the natural feel of the vocals a little bit. I like to use the Normalize option instead. What this does is boost up the volume to your chosing by using either percentage or decibel calculations you put into it. To get into this option, goto:
Transform > Amplitude > Normalize
Make sure "Decibels format" is unchecked and set the "Normalize level" to 95%. Press OK.
6. AIPL WarmTone
This is another plug-in designed to make your vocals mesh well with the beat. This blending of vocal leveling is usually called a "warm" effect. I got this plug-in and really underestimated it. When you look at the layout, it looks very cheesy and you may want to discard it, but do not judge this book by its cover! If you have AIPL WarmTone, goto:
Transform > DirectX > AIPL WarmTone
Goto the Presets, select "Mellow Blend" and push the ProSound button in. Now chose Add Preset and save this so next time you use this plug-in, you can access it right from the Presets list.
7. Normalization
Almost the same as Step 5, but changing the level. Goto:
Transform > Amplitude > Normalize
Make sure "Decibels format" is unchecked and set the "Normalize level" to 100%. Press OK.
8. Finishing Touches
Now just go back over your audio to make sure there aren't any unwanted background noises that are being picked up during moments when you aren't making any noise on the microphone. If there are, refer to Step 2 to silence those noises.
I always run another Noise Reduction for my last step just to make sure the unwanted hiss or hum is completely taken out on my finished product. To refer back to Noise Reduction, repeat Step 1.
Now, you are ready to start Polishing Your Audio!
• VIEW PRINTABLE VERSION


